I combined a ceiling pendant light and a broken torch lamp to create this unique wall pendant light.
This is the second creation from a broken floor lamp! Repurposing items is fun and environmentally friendly.
Normally for my projects I’d google a lot, do a lot of research and have lots of informational blog links for you but this project was created all by me. The only thing I googled was parts I needed.
The ceiling pendant light shade was from my old house that I swapped for a cheaper one when I sold it.
Decide on the Look of your pendant light
What to do with this ceiling pendant light? I don’t have a ceiling electrical box, I don’t want to put one in plus I have ceiling heat so it’s not an option. I came up with the idea to hang it off of a shelf bracket with a plug in cord. Pendant lighting is perfect to give you light without taking up floor space.
First challenge, getting a shelf bracket large enough to keep the light shade from hitting the wall.
Second challenge, figuring out how to convert this to a plug in light instead of directly wired into an electrical box.
First Challenge – Shelf bracket for hanging light
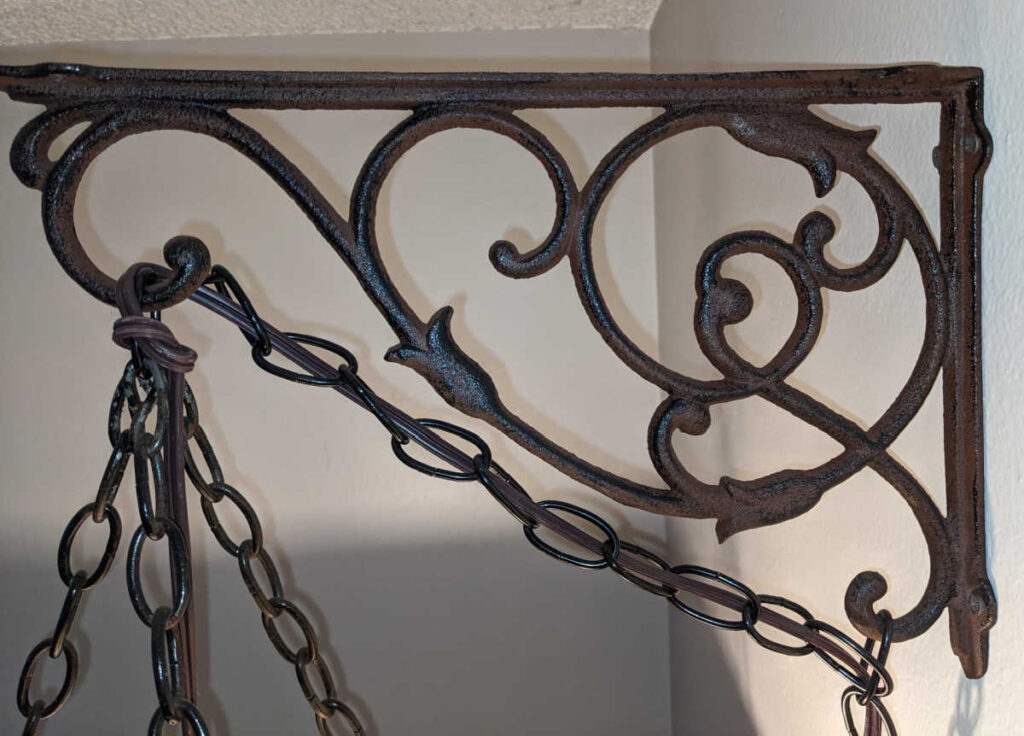
Measure the width of the light shade. Decide where your shelf bracket should rest over the light shade. For example I decided that the light should hang down directly in the center of the shade. Therefore, the end of the shelf bracket should hit in the exact middle of the light shade with the light bulb hanging off of the end of the bracket. Another option, longer shelf bracket with light bulb hanging from the middle of the shelf bracket. This would create a dramatic look.
I calculated the inches from the middle of the shade and added a couple extra to keep it from hitting the wall. I did an Amazon search for Shelf Bracket X Inches. This is the one I came up with (this is NOT an affiliate link) Ornate and 13.5”, perfect size! https://www.amazon.com/gp/product/B01BJ6USE6/ref=ppx_yo_dt_b_search_asin_title?ie=UTF8&psc=1
Second Challenge – converting direct wire ceiling pendant light to plug in
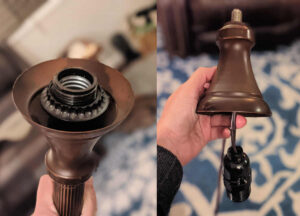
A floor lamps base had broken on me, I had already repurposed its light shade. I decided to use the cord, socket and Torchiere Holder to keep repurposing this broken lamp.
I cut the plug off the end of the cord, unscrewed each piece of the lamp and pulled the cord through. Now I have a long cord and socket that can hang from the shelf bracket over the light shade. I put the direct wire pieces from the ceiling pendant light to the side.

Parts Needed
- Wall plug replacement for electrical cord – Home Depot (Not an affiliate link) https://www.homedepot.com/p/Leviton-15-Amp-125-Volt-2-Pole-2-Wire-Polarized-Plug-White-R62-00101-0WH/302183191?MERCH=REC-_-searchViewed-_-NA-_-302183191-_-N
- Chain to reinforce the cord – 8 feet purchased from – I loosely guess this number thinking well my ceilings are 8 foot high
- Paint to color match parts – I have this on hand. I used Sienna brown and gloss black spray paint, perfect
- Shelf Bracket
Paint
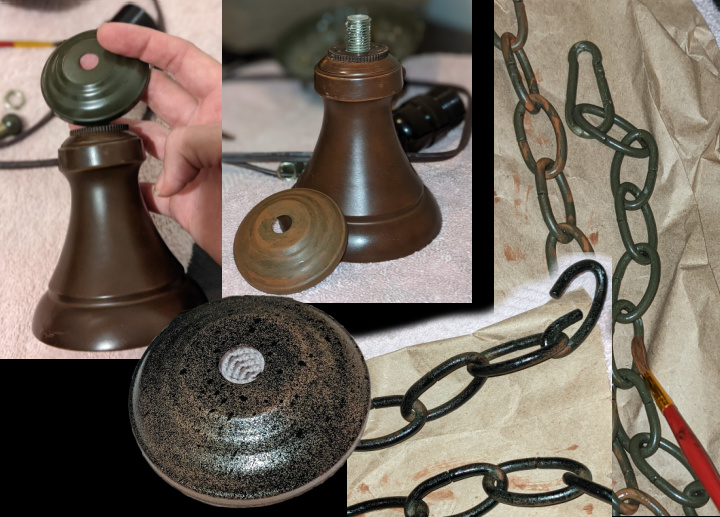
The ceiling pendant light has its own hanging chains with great little clips on them so you can easily remove the shade to wash it and empty out all those little bugs that seem to collect in every light I own (where do they come from!?). These hanging chains were an odd color.
Another stray part I decided to use from the ceiling pendant light, we’ll call it a top cover piece, was also an odd color. Both needed to be painted to match the torchiere holder. The rest of the parts of the ceiling pendant light are sitting in a box now, waiting for disposal…or another project!
With a small paint brush I dipped into the paint and quickly applied the reddish-brown paint. I did not cover the chains or the top cover completely and I did not make it smooth, I just got it on there. Then I lightly speckled them all with glossy black paint to match the glossy black chains.

To get a speckled look I keep the spray paint high above my piece, about 2 feet and just hit the button and let go quickly, I do this a few times at different angles. The spray paint will spit out instead of cover. You do need to make sure your area where you are painting is well covered as this does send paint everywhere.
Now the top cover blends with the torchiere holder and I’ve ended up with chains that are brown and black to match the wall bracket that also compliment the pendant light. Win Win!
Thread the chain, add the plug
With the plug removed from the cord it was easy to thread it through the chain. I left about 2 feet of the cord to the wall plug not covered by chain, and I had about 3 feet of extra chain.
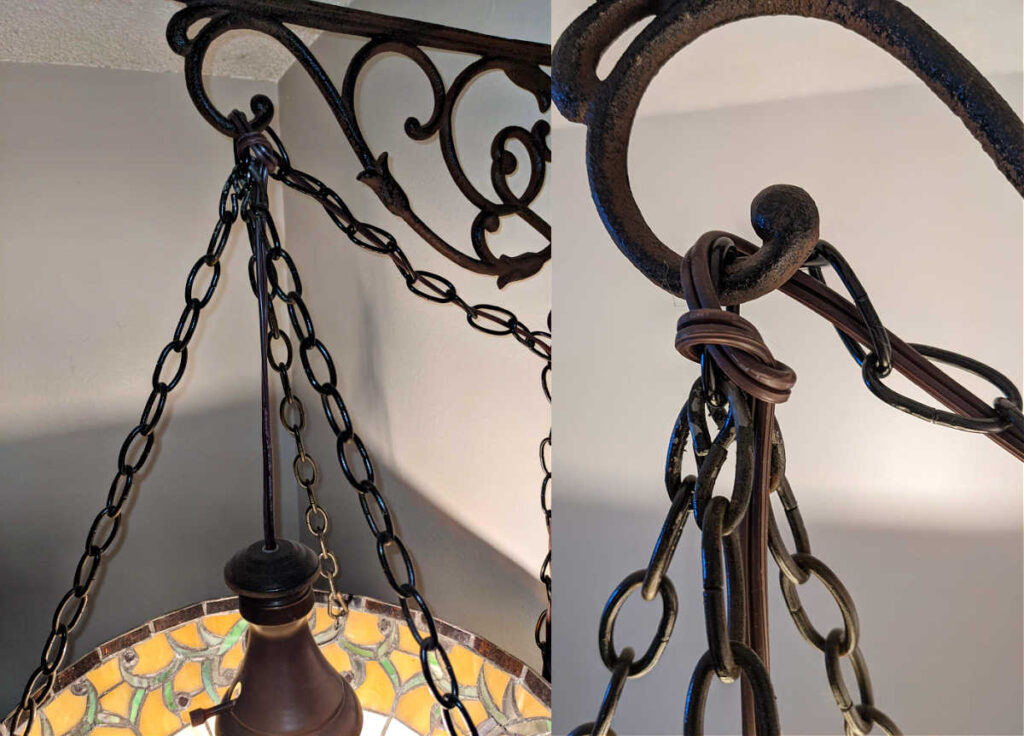
**PRO TIP** Determine your length of cord from lightshade, to socket, to bracket. Tie a knot with the cord on the first one or two chains. Feed the rest of your cord through.
(Otherwise the socket will pull the cord through the chain and it will just keep getting longer and longer and longer…)
Then I took the replacement plug part and connected it to the cut end of cord. This was harder than I thought it would be, it took quite a bit to clamp in the wires. But it’s working! I did end up cutting my finger and I didn’t put the two ends of the cord in the right spot at first. I recommend you look up some photos on this, I was too intent on making it work to capture it.
Figure out how to connect it all to the bracket
Next, I played with connecting the light socket and the lamp shade to the bracket. With the chain around the cord and the style of the shelf bracket I chose it made it easy. The chain links simply just slipped over the decorative curls and stayed in place. My original thought was I’d use matching zip ties or jewelry wire to attach it.
I connected the lamp shade chains to the chain looped onto the bracket and held it up for a test run PRIOR to mounting the bracket. It all held, and it leveled out and hung just like I wanted.

Mounting the shelf bracket
I lucked out and using my trusty stud finder I found that there was a stud directly in the center of where I want to hang my new lamp. If there wasn’t I would have used heavy anchors.
I eyeballed the height with the help of someone holding it, I decided just even with my curtain rods would be a perfect height. It needed to be low over the couch, but tall enough people wouldn’t hit their head. There was no exact science here just moving it up and down until it looked right.
Stringing up the hanging light
This was pretty easy since I’d already done a test run and the light shade was already attached to the cord.
I carefully hooked the chain to the right places and poof! My light was hung! I added a light bulb, plugged it in – realized I HADN’T tested this part – don’t do that, test your light before you hang it, what if I had gotten that plug wrong? But it worked, so I was happy.

Final product
I am SO HAPPY with how this turned out. Every day I love it and it makes me smile.
What can you repurpose around your home?
