
Welcome to my Kitchen Renovation project! This project blog will bring you helpful resources, I’ve done the research for you. I have this separated into different posts to list what things I needed to know the most, give an actual timeline and costs of everything used.
It will not regurgitate the same facts that are already out there. If you’re like me you already do a lot of research, which is why you are here! I’ve listed the resources I used on this main page and then I’ve linked them in each post where they were helpful to me.
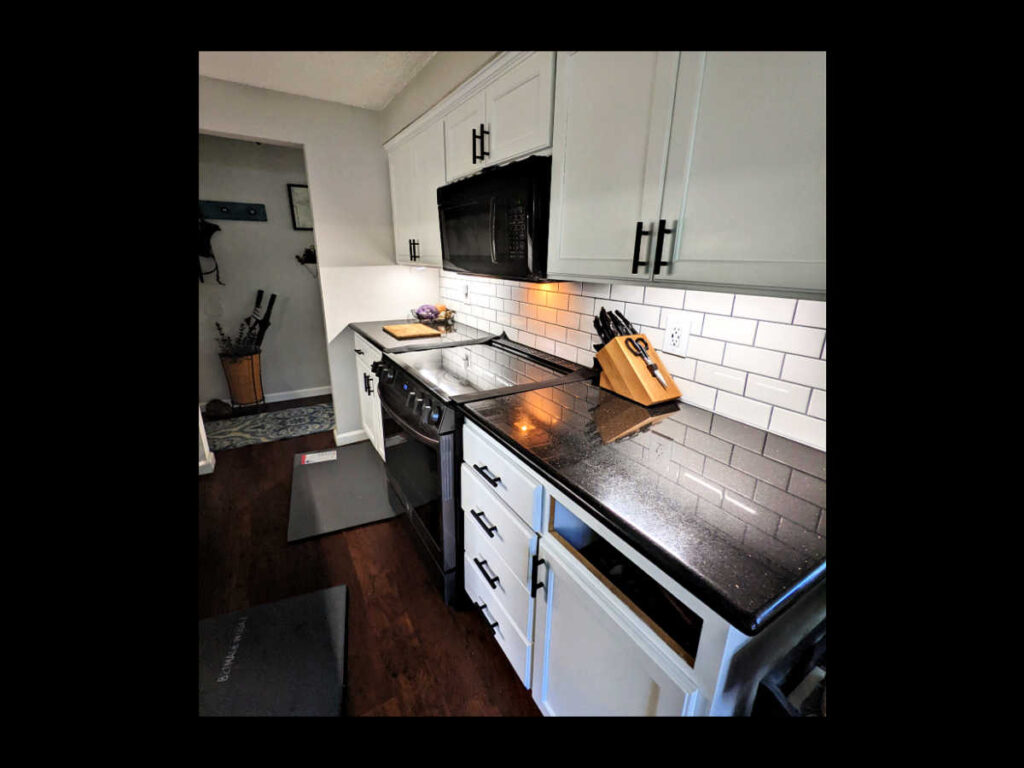
Kitchen Goal: Full kitchen renovation with an updated clean white kitchen. Kitchen organizers in the lower cupboards. New oven range.
Current Kitchen: Pine Wood kitchen cupboards. (Surprise! Later learned the kitchen cabinets were laminate! This added more complexity-see the article Painting Kitchen Cabinets – What I Wish I Knew). Jumble mess of cupboards. Old Oven Range.

Kitchen Renovation Series
Motivation for Projects
Ever wonder how truly long a project takes? How do you get all the steps in and plan it all out? I went back through all of my notes, texts to friends and family, purchases and arrivals and came up with a very Detailed Timeline of all 5 Stages Combined. You can see here that I did something almost every day. I had gaps in between stages to stave off burnout and not have my kitchen completely unusable for months as that’s just not realistic.
For every project I create a OneNote page. In that OneNote I make very detailed steps, enough details that when I hit a procrastination stage I can look and see super small steps to get me moving. For example one section may look like this:
- Clean with tsp/degreaser
- outside of cupboards/drawers
- Inside
- clean fully inside shelves & drawers
- Vacuum bits
- Quick remove/reorganize/declutter/wipe
- Measure cupboards that will have organizers & declutter/clean more
- clean fully inside shelves & drawers
As you can see I break it down pretty far, for projects that I am really struggling with motivation I break it down even more, to the point of 1. Get sponge from under cabinet 2. Wet sponge… It’s my way of overcoming project procrastination.
Here you can see an example of my actual kitchen OneNote page. It’s messy, it’s my own short hand but it’s my guide book through the whole process.
Stages
Stage One:
Demo of old Kitchen Backsplash, Wall Prep and Electrical Outlet Upgrades
Stage Two:
Tiling a Kitchen Backsplash: 15 Things I Wish I Knew (Part I)
Tiling a Kitchen Backsplash for under $200! Relief from research, get full the supplies list here! (Part II)
Stage Three:
Painting Kitchen Cabinets, Is There an Easy Way? 13 Things I Wish I Knew (Part I)
Painting Kitchen Cabinets with Fusion Mineral Paint – Materials COMING SOON!
Stage Four:
The layers of never ending finish work for a Kitchen Renovation COMING SOON!
Stage Five:
Installing Kitchen Cabinet Hardware and Organization COMING SOON!
Why divide it into these stages?
Making over your kitchen is, in my opinion, not for the faint of heart but totally in the DIY range! I only renovated what was already there. I didn’t replace cabinets or countertops. I did splurge on a new oven range though.
Everyone talks about weekend projects, but large projects like a kitchen take a much longer time. Breaking it into stages makes it easier to accomplish. You can budget for each stage, prep for each stage, schedule and complete each stage without stressing out about the big picture. If I had tried to do my kitchen in one big push I would have quickly lost motivation and probably given up. In this blog series I am including my Actual Timeline, What I Wish I Knew Tips, and a Materials List with pricing. We’ll see how close I come to my original OneNote budget!
My kitchen project kicked off July 2021 when I started trying to decide how I wanted my kitchen to look. Color kitchen cupboards or white? Fancy backsplash or traditional? The options are truly endless… I acquired different types of paint and painted small spots on my kitchen cabinets, see my article on choosing paint color, and I sat with the colors for almost 6 months before deciding to just go traditional white, then I had to choose which white!?!?… I went with Fusion Mineral Casement. Technically this is Stage One, but really the work is what I’m counting as the true Stage One.
Demo of the old backsplash (a simple board) and electrical outlet replacement started November 27th.
Tiling the Kitchen Backsplash started Dec 10th finished the 11th. I chose a traditional white subway tile 3×6. We tiled it in one day, it’s actually a lot easier than it looks! The next day we grouted. I sealed it a few days after the grout dried, it was super easy and took only 30 minutes total.
Painting of the Kitchen Cupboards Started Dec 28th finished January 3rd with the exception of the drawer fronts. What a nightmare on those! I removed them to paint them better, then they had a strange texture. I re-sanded and re-painted them again. TWICE. I considered myself finally done by March 3rd – including the top coat, handle hardware, side wall fixes and under cabinet organization.
All total about 8 months of decisions and work. The actual physical work was around 3 months intermittently. I’m STILL NOT completely done. I want to upgrade lighting and replace the faucet. :/ maybe in another few months.
Resources I used to accomplish my kitchen renovation:
Home RenoVision DIY https://youtu.be/HIyIGJcJejU
Mark Shows https://youtu.be/lID-aE515rI
Home RenoVision DIY https://youtu.be/dxPmaMQYkOU
Brent Darlington https://youtu.be/ifd8EadmB7Y
“This Grouting Mistake will Ruin Your Tile Job” https://youtu.be/cOnvsU0Q-eg
Fusion Mineral Kitchen Makeover https://fusionmineralpaint.com/kitchen-makeover-with-fusion-mineral-paint-in-2-simple-steps/
Kitchen cabinets the easy way Kaleidoscope Living https://designertrapped.com/how-to-paint-kitchen-cabinets-the-easy-way/